
A couple of weeks before Plainsight joined SoftIron’s partner program, I started playing with FilterBox following the Plainsight documentation.
To my surprise, I was able to run some of the initial filters on HyperCloud VMs without using GPUs, although the output was noticeably laggy. One particular filter (General Object Detection) would consume all CPU available, and we thought it would be a good case to test on our GPU-enabled compute nodes.
Here I will explain how I did it. For simplicity, we are going to let FilterBox install the dependencies itself on a single VM, instead of creating a multi-node k3s cluster beforehand.
We are going to create two different VMs. One to run the Plainsight k3s cluster (GPU enabled), and another (optional) VM to run an RTSP stream.
Instantiate VM for Plainsight software
We need to create an Ubuntu 20.04 VM with NVIDIA PCI passthrough. For this we can clone an existing HyperCloud template for this image, and then update it.
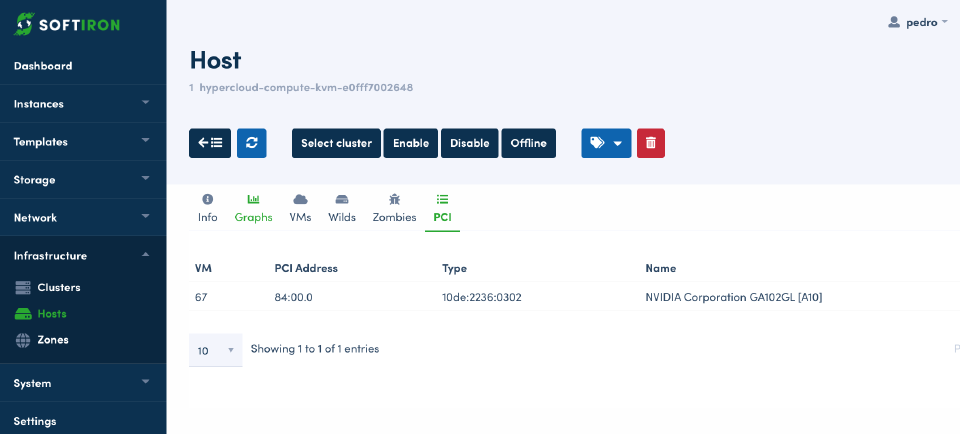
First, I checked which compute node had the GPU device. This step is not mandatory, but I wanted to verify my cluster had one available. To do this in the HyperCloud GUI, navigate to Infrastructure > Hosts and then select a Host. If any PCI devices are attached, the PCI tab on the host will list them.
Alternatively, you can do this from the HyperCloud Dashboard command line usingsifi:
sifi list host | jq -r '.hosts[] | select(.host_share.pcidevices != []) | [.name, (.host_share.pcidevices[] | "\(.device_name) - (device: \(.device), class: \(.class), vendor: \(.vendor))")] | @tsv' | column -t -s$'\t'
Example output:
hypercloud-compute-kvm-e0fff7002648 NVIDIA Corporation GA102GL [A10] - (device: 2236, class: 0302, vendor: 10de)
VM template configuration
Next, I needed to make sure the VM runs on the compute node with the GPU device, and to configure some options to pass-through the device. To do this, I navigated to the VM template in the HyperCloud GUI, and clicked on Update.
On the Input/Output tab, we can select PCI devices to passthrough.
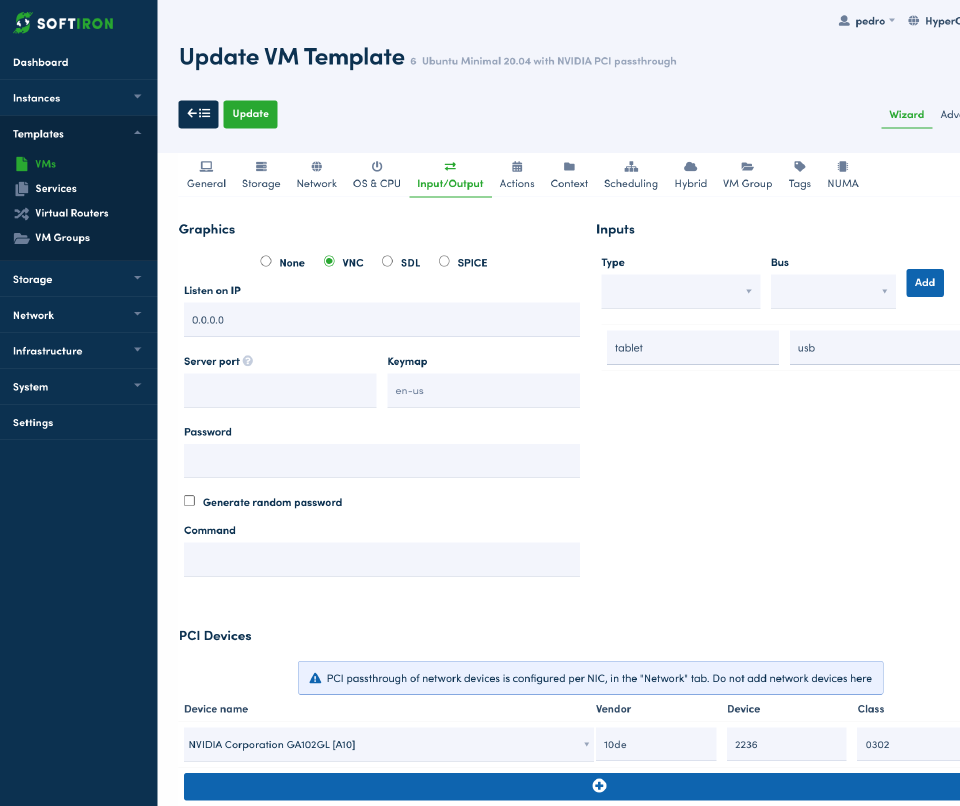
Now this VM template will only be deployed on nodes with this type of PCI device.
Note: when passing-through the device, you will only be able to instantiate one VM per node (assuming the node has only one GPU).
After these changes, our VM template will now contain the following PCI configuration:
PCI = [
  CLASS = "0302",
  DEVICE = "2236",
  VENDOR = "10de" ]
Now we are ready to create an instance using this template. I instantiated it with 16 VCPUs and 32GB of RAM.
Once I had the Ubuntu VM running, I checked the PCI device was showing up with lspci:
lspci | grep -i NVIDIA
Giving me the following output:
01:01.0 3D controller: NVIDIA Corporation Device 2236 (rev a1)
Update 11 April 2024 A previous version of the “VM template configuration” section of this blog post indicated we needed to install the drivers on the host VM. That is no longer true, so the post has been updated to reflect this.
Set up and configure the RTSP stream
If you don’t have RTSP streams available, you can probably find some example streams online. I personally wanted to avoid any latency caused by consuming external streams, so I created an RTSP server on the same HyperCloud cluster.
Install Docker on a second VM
First, I instantiated another VM and followed Docker docs to install Docker. I’ll summarize the key steps below.
Add Docker’s official GPG key
sudo apt-get update
sudo apt-get install ca-certificates curl
sudo install -m 0755 -d /etc/apt/keyrings
sudo curl -fsSL https://download.docker.com/linux/ubuntu/gpg -o /etc/apt/keyrings/docker.asc
sudo chmod a+r /etc/apt/keyrings/docker.asc
Add the repository to apt sources
echo \
  "deb [arch=$(dpkg --print-architecture) signed-by=/etc/apt/keyrings/docker.asc] https://download.docker.com/linux/ubuntu \
  $(. /etc/os-release && echo "$VERSION_CODENAME") stable" | \
  sudo tee /etc/apt/sources.list.d/docker.list > /dev/null
sudo apt-get update

sudo apt-get install -y docker-ce docker-ce-cli containerd.io docker-buildx-plugin docker-compose-plugin
Configure RTSP server
Then, I created a configuration file for the RTSP server, and ran the server using a ready-to-go container image. To simplify this task, you can copy-paste the following:
mkdir container
cat << EOF > container/rtsp-simple-server.yml
protocols: [tcp]
paths:
  all:
    source: publisher
EOF

cat << EOF > container/run.sh
docker run --rm -d -v $PWD/container/rtsp-simple-server.yml:/rtsp-simple-server.yml -p 8554:8554 aler9/rtsp-simple-server:v1.3.0
EOF
chmod +x container/run.sh
Now you can execute it with:
cd container
./run.sh
Source a video and then stream it
Now with the RTSP server running, we need to stream a video to it. There are plenty of videos available to test with at Pexels, or just download the one I used:
curl -L "https://www.pexels.com/download/video/6127661/?fps=25.0&h=720&w=1366" -o shop-wine-hd.mp4
To be able to stream this to the RTSP server I needed ffmpeg:
apt install -y ffmpeg
To stream the video, I used the following command:
ffmpeg -re -stream_loop -1 -i shop-wine-hd.mp4 -s 1280x720 -f rtsp -c:v libx264 -b:v 1000k -rtsp_transport tcp rtsp://localhost:8554/live.stream
The RTSP url will be rtsp://<your VM IP>:8554/live.stream. In my case, this was:
rtsp://192.168.10.4:8554/live.stream
Just change the IP to the one used by your server. (If you want to use a specific IP, and it isn’t the one currently used by your VM, you can reserve the desired IP and then assign it to the VM in the HyperCloud GUI).
Install FilterBox
Back on my first VM, I installed Filterbox, following the Plainsight documentation. A summary of what this involved is below.
ARCH=x86_64
VERSION=1.0.0
wget "https://github.com/PlainsightAI/filterbox/releases/download/v$VERSION/filterbox_Linux_$ARCH.tar.gz"
tar -xf filterbox_Linux_$ARCH.tar.gz
mv ./filterbox /usr/local/bin
Next I ran the following command to install and initialize all the dependencies, including k3s:
filterbox init
Enable GPU on Kubernetes cluster
To make use of our NVIDIA GPU with Kubernetes, we need to run the following:
helm repo add nvidia https://helm.ngc.nvidia.com/nvidia && helm repo update
helm install --wait --generate-name -n gpu-operator --create-namespace nvidia/gpu-operator
This horrible command found online can help you identify whether Kubernetes can see your GPUs, and if they are available or not:
kubectl describe nodes | tr -d '\000' | sed -n -e '/^Name/,/Roles/p' -e '/^Capacity/,/Allocatable/p' -e '/^Allocated resources/,/Events/p' | grep -e Name -e nvidia.com | perl -pe 's/\n//' | perl -pe 's/Name:/\n/g' | sed 's/nvidia.com\/gpu:\?//g' | sed '1s/^/Node Available(GPUs) Used(GPUs)/' | sed 's/$/ 0 0 0/' | awk '{print $1, $2, $3}'
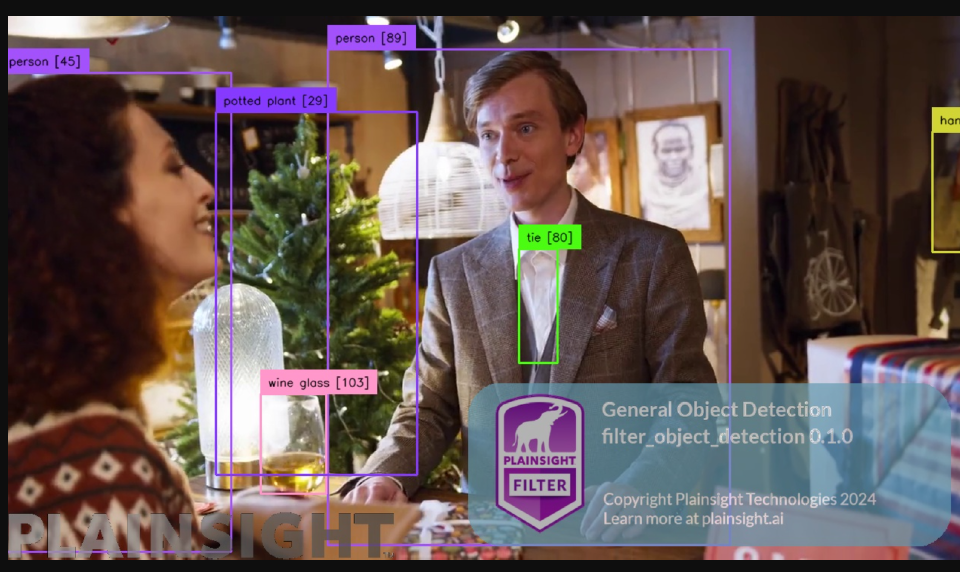
Install a filter
Now using filterbox you can install and configure filters. For this
example we are going to install the object detection filter using the RTSP
stream we generated earlier.
These commands can’t be completely copy/pasted as it’s an interactive CLI. To give you an idea of what to expect, this was my terminal output:
root@localhost:~# filterbox filter install
Hang tight while we grab the latest from your chart repositories...
...Successfully got an update from the "nvidia" chart repository
...Successfully got an update from the "plainsight-technologies" chart repository
Update Complete. ⎈ Happy Helming!⎈
Choose a Filter:
   Face Blur
>  General Object Detection
   Seymour Pong
Choose a Filter Version:
>  0.1.0
Input your Video Source?
this can be a device number for a USB Device (example: 0,1)
or this can be an RTSP Address (example: rtsp://10.100.10.20:8000/uniqueIdHere
rtsp://192.168.10.4:8554/live.stream
2024/03/05 15:49:17 [debug] CHART PATH: /root/.cache/helm/repository/filter-0.18.0.tgz

2024/03/05 15:49:18 [debug] creating 4 resource(s)
...
...
...
If you check your CPU now using htop, you will see all cores become very busy, at
least with the object detection filter:
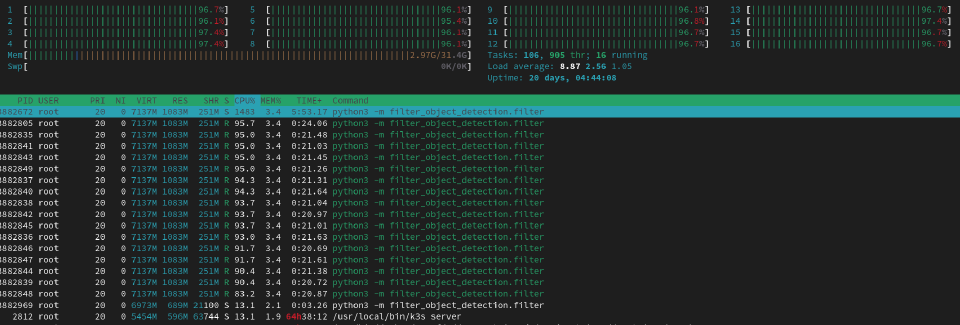
This is because we are not yet making use of the GPU. To do that, read on.
Enable GPU on filter
To enable the GPU, we need to patch the generated deployment to find out the service name:
kubectl get deployments -n plainsight
You will see something like filter-object-detection-gvpf.
Let’s patch it to give it access to the GPU:
kubectl patch deployment -n plainsight filter-object-detection-gvpf -p '{"spec":{"template":{"spec":{"containers":[{"name":"filter","resources":{"limits":{"nvidia.com/gpu":"1"}}}]}}}}'
You will be able to see the pod being recreated using:
kubectl get pods -n plainsight
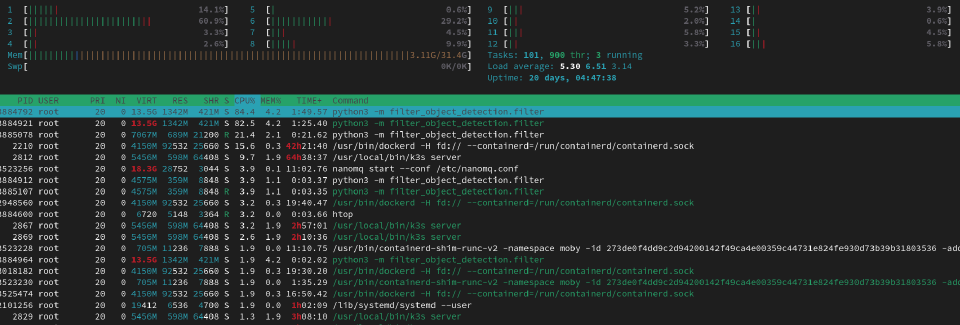
Additionally you can check to see how your CPU usage has dropped with htop.
Watch the filter in your browser
For this we will have to port-forward to access the filter from outside the cluster. If not present yet, you will need to install the following:
apt install -y socat
Find out the name of the service:
kubectl get services -n plainsight
Forward the port:
kubectl -n plainsight port-forward svc/filter-object-detection-gvpf --address 0.0.0.0 8080:8080
Access the stream from a browser, in my case this was done at http://192.168.10.3:8080/video_feed/0