

If you’ve already been using GKE (Google Kubernetes Engine) as your public cloud container platform, but now need to run workloads on-premises or across multiple clouds, it makes a lot of sense to look to Anthos. GKE still runs under the hood, giving you access to the tools and APIs you’re used to, but with extra features like Anthos Service Mesh and Multicluster Service Mesh. So far, so good.
But what about the infrastructure you’ll need for any private clouds in your new solution?
HyperCloud is a true private cloud solution built on a foundation of secure provenance and full stack interoperability. It’s a little bit different to what else is out there on the market, but for the purposes of this post, think of it like a turn-key private cloud that handles everything from provisioning and managing bare metal to presenting a cloud API.
I wanted to see how HyperCloud would work with Anthos, so I recently gave the two a spin to see how well they’d mesh.
How do Anthos and HyperCloud work together?
Anthos 1.15 is installable on HyperCloud utilising pre-created virtual machines and the bare metal Anthos installation process. The resulting Anthos cluster is able to leverage HyperCloud storage via the HyperCloud CSI driver and can be connected to the Google Cloud dashboard web services.
Anthos can easily consume HyperCloud Instances created using Terraform. Networking setup is straightforward and VIP-based Load Balancing is available on HyperCloud.
Here’s how I went about setting up a proof of concept Anthos and HyperCloud cluster
I’ve previously worked with a few different Kubernetes distributions, from OpenShift, RKE2, K3S to kubespray and even Tanzu/PKS, so I have experience of different installers - but this was my first time trying out Anthos.
My plan was to do a straight-forward deployment and see what obstacles presented themselves. I used Terraform to build my VMs, then moved on to the Anthos installer.
Prerequisites
Google Anthos version
Anthos version 1.15 was used for this PoC (Proof of Concept).
HyperCloud version
HyperCloud 1.4.3 was used for this PoC, the same process would apply to HyperCloud 2.x
Node prerequisites
Node sizing for Anthos installation
Edge profiles allow for Anthos installation on edge devices with limited resources. Typical Anthos usage in the data centre would use the Default profile.
| Node | Purpose | CPU cores (min/recommended) | RAM GiB (min/recommended) | Disk GiB (min/recommended) |
|---|---|---|---|---|
| Admin (Ubuntu) | Install tooling | 2/4 | 4/8 | 128/256 |
| Admin (CentOS/RHEL) | Install tooling | 2/4 | 6/12 | 128/256 |
| Default | Control Plane or User Nodes | 4/8 | 16/32 | 128/256 |
| Edge (Ubuntu) | Control Plane or User Nodes | 2/4 | 4/6 | 128/256 |
| Edge (CentOS/RHEL) | Control Plane or User Nodes | 2/4 | 6/12 | 128/256 |
Supported operating systems
These operating systems are supported for admin workstation and cluster nodes for both default and edge profiles.
| Distribution | Versions |
|---|---|
| CentOS | 8.2, 8.3, 8.4, 8.5 |
| Red Hat Enterprise Linux | 8.2, 8.3, 8.4, 8.5, 8.6, 8.7 |
| Ubuntu | 18.04 LTS (kernel 5.4+), 20.04 LTS, 22.04 LTS |
Only these operating systems are supported; others will throw an error during prerequisite checks.
Node Configuration
Ubuntu 22.04 LTS was used for this PoC. One admin workstation was used to start the install and the cluster consisted of one control plane node with 8vCPU and 17GiB RAM and two worker nodes set to 8vCPU and 20GiB RAM.
Disk space was set to 100Gib for all nodes, as they had a single root disk and a strict minimum of 70GiB free space was observed to be checked by the installer:
/: 17 GiB (18,253,611,008 bytes)/var/lib/containerd:- 30 GiB (32,212,254,720 bytes) for control plane nodes
- 10 GiB (10,485,760 bytes) for worker nodes
/var/lib/kubelet: 500 MiB (524,288,000 bytes)/var/lib/etcd: 20 GiB (21,474,836,480 bytes) applicable to control plane nodes only
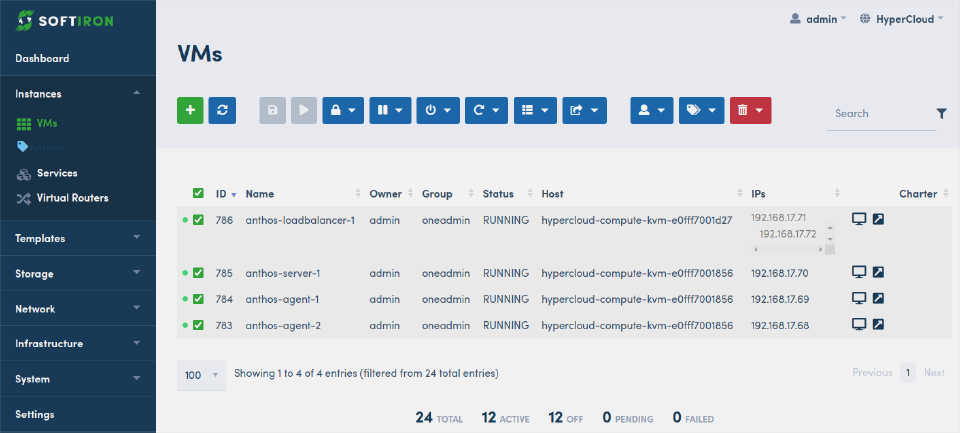
Admin and cluster nodes were deployed using the HyperCloud Terraform provider, which allowed us to quickly stand-up a set of identical cloud Instances to use in Anthos.
Deployment with admin cluster

The full Anthos install process requires creation of an admin cluster to house the CAPI (Common Application Programming Interface) objects needed to build each user cluster. These CAPI objects must be present in a pre-existing Kubernetes cluster before the new Kubernetes cluster is built. The objects relating to CAPI configuration of the user clusters remain in the admin cluster.
Creating the first cluster takes longer this way - but creating subsequent clusters is faster.
Deployment without admin cluster
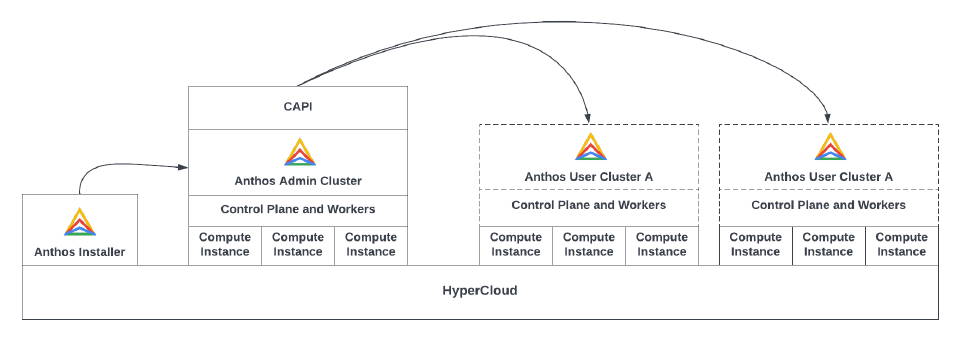
This PoC was installed following the Anthos bare metal installation guidelines, which skips the need for an admin cluster by using KIND (Kubernetes IN Docker) for the bootstrap. KIND allows for a single node to be used to run the installation entirely within a single Docker instance. In this case, the single KIND node provides API storage for the objects representing the yet-to-be-built cluster prior to build.
Note: Using KIND as an ephemeral Kubernetes cluster simplified the installation process but would be slower for multiple clusters, as this KIND node must be rebuilt each time a new cluster is created. Once deployment of a cluster is completed, the KIND cluster is stopped and only the user cluster remains.
Linkage to Google Cloud Services
Clusters are linked to Google’s Cloud APIs prior to installation. It appears that the process of creating clusters or adding nodes cannot be conducted without Google API connectivity. Temporary disconnections are possible, but core functionality like logging and monitoring requires a permanent internet connection.
Installation preparation
Set up admin workstation
To install the Kubernetes cluster, we must first gather the necessary tools and configuration files. The admin workstation houses these components and the process is explained in Set up your admin workstation in the Google Cloud documentation.
Software components
A standard 22.04 LTS server image (no GUI) was used with normal Ubuntu-server packages and setup proceeded without obstacles.
Docker was installed from docker.io as per the instructions from Google, although podman should work also.
$ sudo apt install docker.io
google-cloud-cli packages were added using the google package repo.
Once google-cloud-cli tools are installed we need to install two binaries, bmctl and kubectl. These are downloaded, made executable and moved to /usr/local/sbin
Prepare cluster template
With `bmctl`` available, we now log in to gcloud and create a blank cluster template.
You will need to enable Google Cloud APIs for your account if you haven’t already done so.
$ gcloud auth application-default login
$ bmctl create config -c <CLUSTER_NAME> \
 --enable-apis --create-service-accounts --project-id=<PROJECT_ID>
This creates a yaml file in the bmctl-workspace/<CLUSTER NAME> directory with a number of fields we need to update:
sshPrivateKeyPath:SSH key - for passwordless connections from admin workstation to nodes.gcrKeyPath:Google Cloud key path - created in the directory where you ran the “gcloud auth application-default login” command.gkeConnectAgentServiceAccountKeyPath:Google Cloud key path - created in the directory where you ran the “gcloud auth application-default login” command.gkeConnectRegisterServiceAccountKeyPath:Google Cloud key path - created in the directory where you ran the “gcloud auth application-default login” command.cloudOperationsServiceAccountKeyPath:Google Cloud key path - created in the directory where you ran the “gcloud auth application-default login” command.projectID:project as created in the Google Cloud API web console.controlPlane:nodePoolSpec:nodes:address:IPs of the control plane node VMsnodes:address:IPs for the worker node VMs.loadBalancer:addressPools:IPs of load balancers (optional, can use nodes if omitted).loadBalancer:vips:controlPlaneVIP:IP of Kubernetes control plane VIP - load balanced access to API.loadBalancer:vips:ingressVIP:IP of the ingress - load balanced application traffic.clusterNetwork:pods:cidrBlocks:IP range CIDR (Classless Inter-Domain Routing or supernetting) for pod usage - avoid overlap with external networks.clusterNetwork:services:cidrBlocks:IP range CIDR for service communication - avoid overlap with external networks.
Deploy cluster
With the template completed and SSH keys authentication set up between the admin workstation and nodes, you are ready to deploy the cluster.
$ bmctl create cluster -c <CLUSTER_NAME>
The deploy command lists a log file where more detailed information is available. To obtain more detailed information, open another terminal on the admin workstation during deployment and tail -f the log file.
Troubleshooting
If deployment fails, pay attention to the contents of the error messages and make sure that your nodes are online, sized correctly and using a supported OS.
Accessing the cluster
After deployment you should be able to use the newly created kubeconfig file to communicate with the cluster.
$ export KUBECONFIG=$HOME/bmctl-workspace/CLUSTER_NAME/CLUSTER_NAME-kubeconfig
$ kubectl get nodes
Once you have obtained the kubeconfig file, you can create additional users with a more limited scope, for example to allow administrators or developers to create and manage deployments within a single namespace.
You can of course access the cluster using kubectl or helm or other tools which speak to the API but you will probably want to show off your shiny new cluster with a shiny new user interface. So let us move onto the dashboard.
Google Cloud dashboard
Cloud Console access for your on-prem cluster can be easily enabled using a token linked to a ServiceAccount in the cluster. A ServiceAccount with ClusterRoleBindings to view the objects in the cluster was created in the previous step, then a Token was added to the ServiceAccount. That token was then input into the webUI to view the cluster.
Other authentication schemes (for example, using a Google account) are possible, but require additional configuration.
Web UI is available via a URL, which uses the project ID field you used to create the cluster:
https://console.cloud.google.com/anthos/clusters?project=<PROJECT_ID>
Choose login then select the Token radio button and enter the Token in the prompt.
Once you have logged in, you will see a number of available pages to view objects in your cluster.
Cluster view
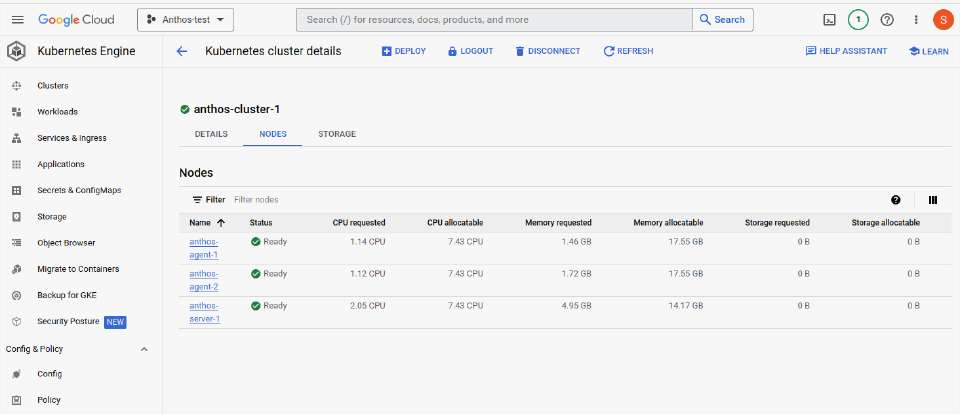
This is the overall view of the nodes comprising a cluster, which is shown in the Kubernetes cluster details tab.
Here you can see the resource usage of each node in the cluster, and click on nodes to drill-down and view more information:
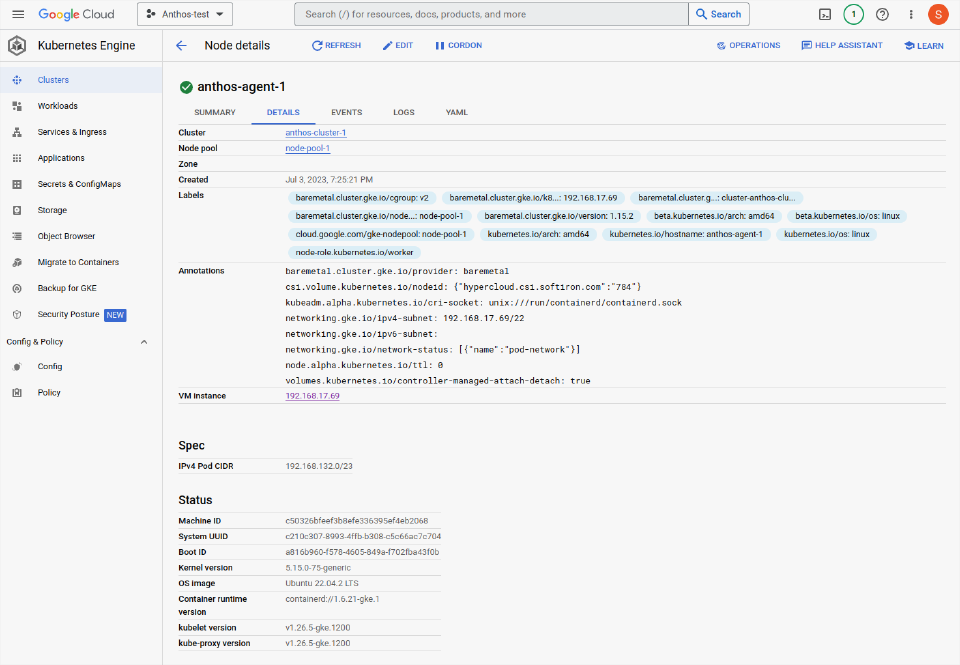
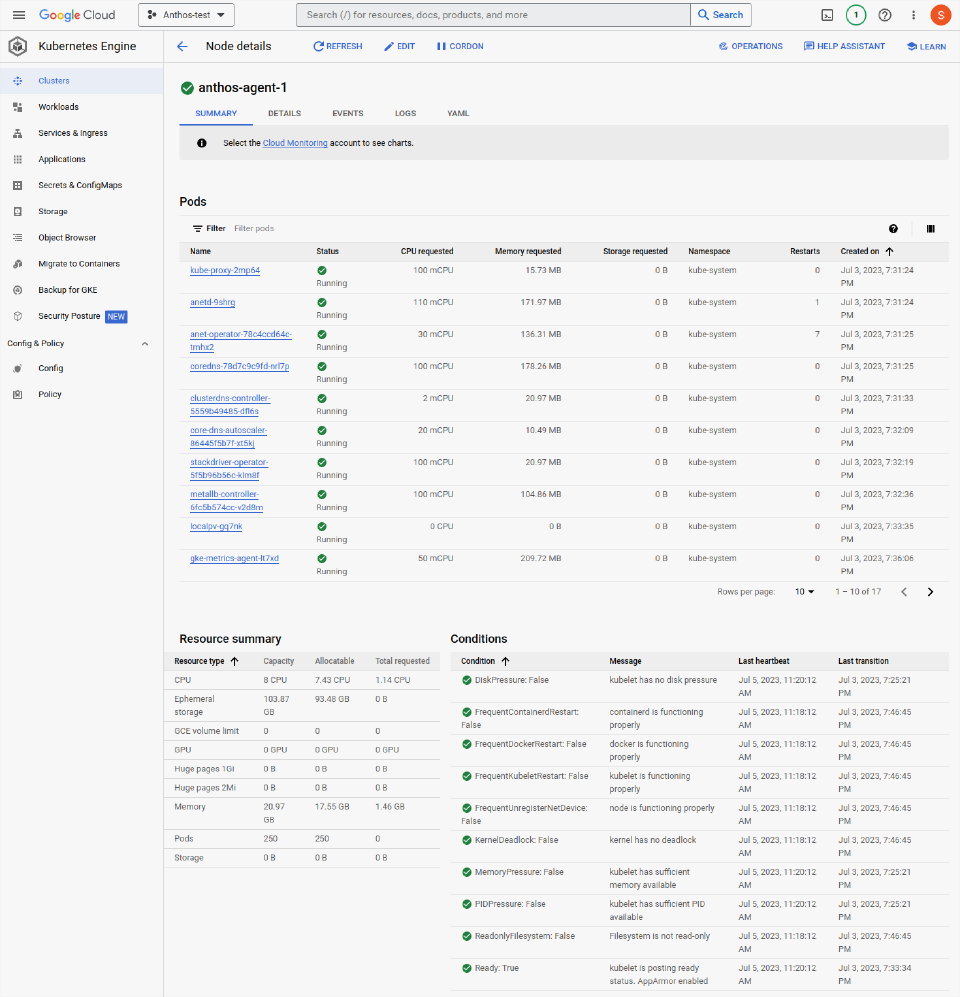
Node details
Sizes, labels and status of the nodes are available when clicking on the node (see the image below for an example). Note the labels assigned to the example node. These are important, as they select which nodes to use for certain tasks.
Labels will show the hostname of the node, along with details like the host OS, architecture and potentially even physical hardware details if the Node Feature Discovery package is installed. This allows complex workloads scheduling to schedule apps in specific subnets, or on node-possessing-specific hardware such as GPUs, or certain families of CPU. For example, ensuring an intensive AI workload is scheduled to run only on servers that have the resources to handle the workload effectively.
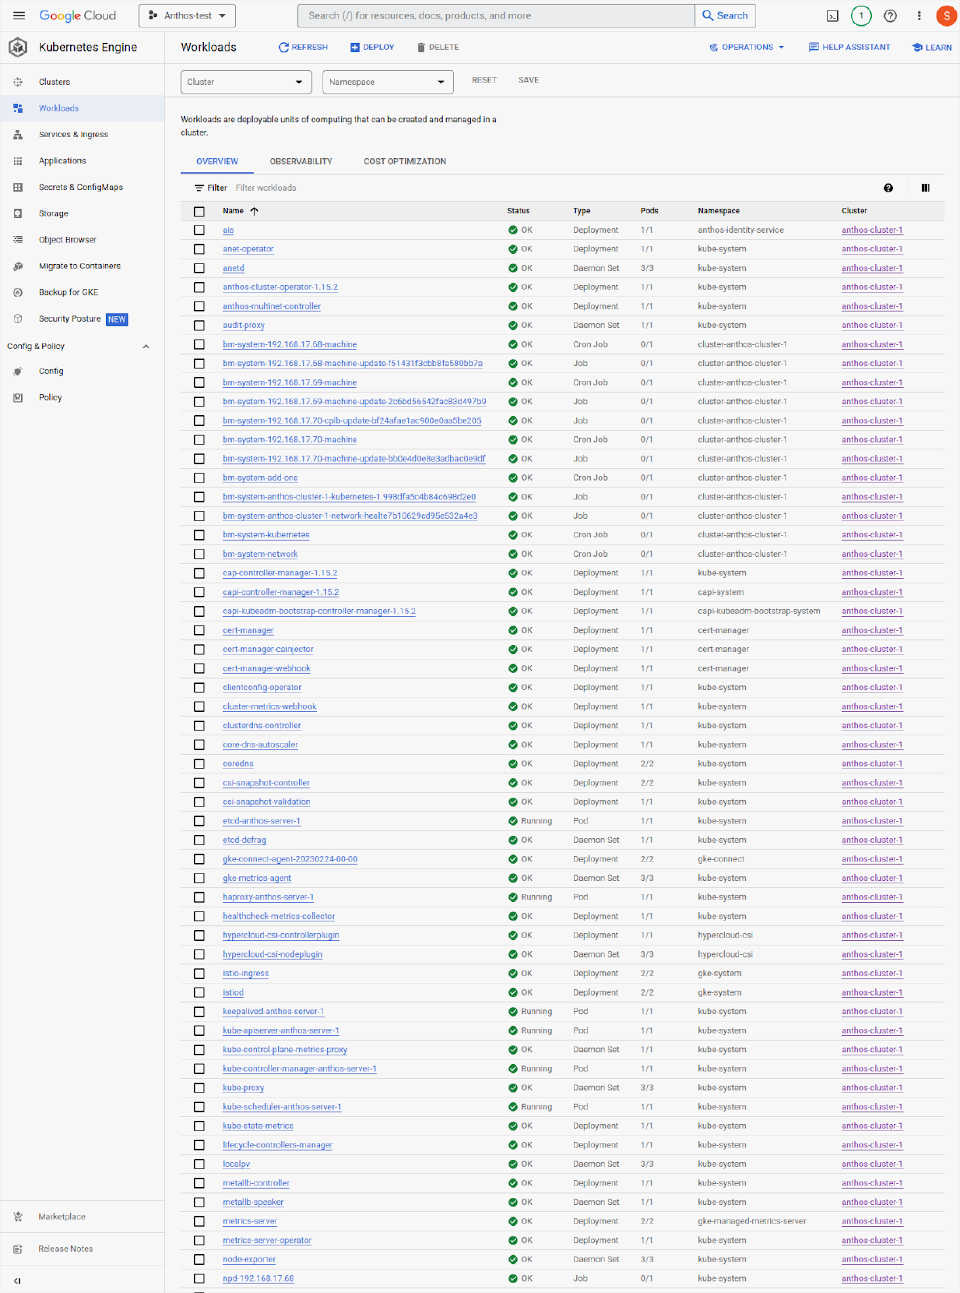
Workloads
Workload view lists all controller-driven apps and bare Pods running on the cluster. Seeing deployments, DaemonSets, ReplicaSets, jobs and cron jobs and others provides a useful overview of activity within the cluster.
Note that HyperCloud CSI is running in this cluster. Installing the HyperCloud CSI drivers enhances integration between Anthos and HyperCloud, as it allows apps to obtain storage on-demand without pre-provisioning disks manually.
Node - running Kubernetes Pods
Looking in a single node, anthos-agent-1, we can see the pod view showing active Pods, resource usage, health conditions and other tabs for events and logs.
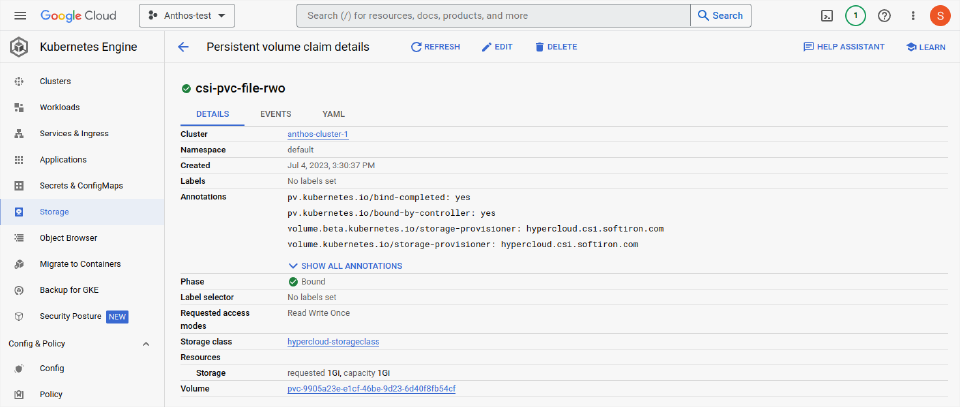
Storage view
HyperCloud CSI drivers have been installed and Anthos is able to interact directly with the HyperCloud storage to create file systems or block storage on demand. The Anthos Cluster can easily expand, clone, snapshot or restore these HyperCloud storage objects as needed.
HyperCloud PVC (persistent volume claim) objects allow administrators and developers to quickly obtain storage for applications, all backed by fast, scale-out and resilient disks from the fully-automated HyperCloud.
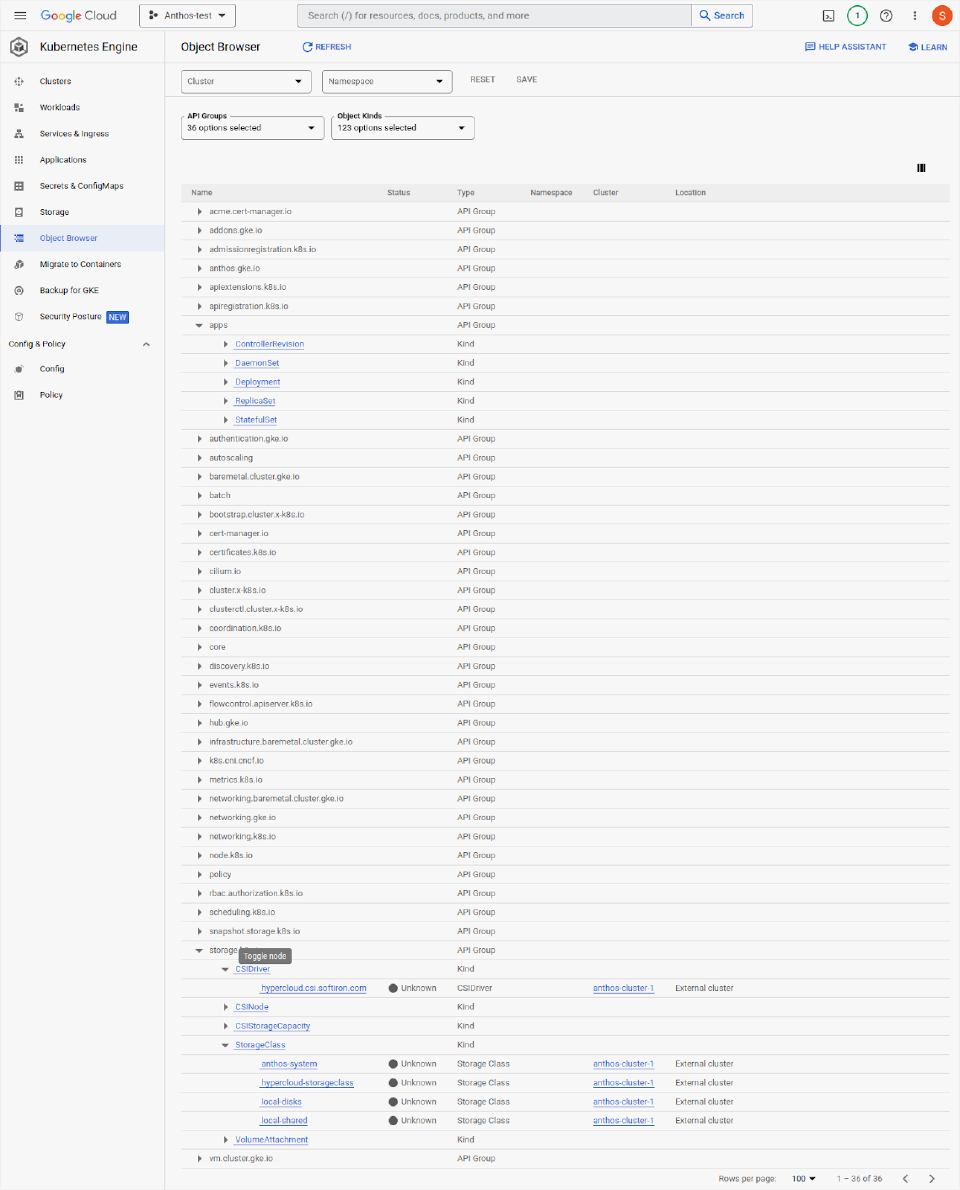
Object view
This is an object browser which displays the HyperCloud CSI storage class. The object browser can be used to view any resource inside the Anthos cluster that the user is assigned permissions to view.
Behaviour and performance
Anthos performed well on HyperCloud, and is usable and performant in the current state. Anthos offers an efficient on-prem Kubernetes platform, with lower resource usage overheads than some of its peers. Anthos and HyperCloud partner well together and present a simple solution that does a good job of covering the entire stack from ordering virtual Instances all the way up to application load-balancing with features like storage on-demand and the Google Dashboard accelerating application delivery.
Where to from here?
This proof of concept demonstrates that Anthos on HyperCloud is a viable thing. But there’s a lot left to explore:
- Node creation and node-pool infrastructure expansion
- Requires pre-creation of HyperCloud Instances outside the Anthos environment.
- CAPI support for HyperCloud could be used to link Infrastructure-Providers more tightly into the system and automatically generate VMs when expanding.
- Load balancing
- Could utilise BGP in conjunction with HyperCloud Interconnects.
- VIP-based load balancing is functional, but there’s more work to be done to match the throughput of ECMP-based systems using BGP.
- Installation process
- Couple be simplified further with some scripting and automation.
- Currently, there’s additional pre-work required to setup google CLI utilities, obtain login tokens and craft template files. This could be automated for a more seamless experience.
- Installation speed could be greatly increased if we link Terraform and Ansible.
Overall, re-running the test once a greater degree of automation was available would greatly improve the initial stand-up times and aid in speed of template creation for new clusters. Production workloads would also benefit from more sophisticated load-balancing, which can be achieved with the HyperCloud hardware switching platforms.